External Label Interface FAQ
Question: How can the software integrate with shipping software packages via an export/import functionality?
Answer: During pick demand confirmation, the software can export package and shipper data out to a text file. These text files can then be imported into third-party labeling/shipping software, such as UPS WorldShip or Clippership. After the third-party package has processed the packages and printed labels, the third-party software may be able to export that package information (including especially the tracking number). This information can then be imported back into Apprise. For information on the data exported to the third-party software, see UPS Shipping Export Format. For information on the data imported back into Apprise, see Package Import Format.
To set up the import/export routine within the third-party software, consult with someone who knows the software well. While it is impossible to document every ship label package currently available, below are the instructions to implement this import/export procedure within UPS WorldShip, one of the more popular packages available today.
Creating the UPS Import Layout
Note For information on setting up integration in Apprise, see Integrating with Shippers.
To create the UPS Import layout via ODBC:
-
Determine the location to which the export file is being written. The export file is created in the folder specified for the shipper interface in the Extract Output Path\File field in Shipper Interface Maintenance.
-
Export package information from Apprise, using pick demand confirmation, before starting the integration setup process because you will need test data to continue. The file that contains the package data will always be called pkgop.txt.
-
Set up a Microsoft ODBC text driver to read in external data on every UPS system. To set this up, perform the following substeps:
-
Open the Windows ODBC Data Source Administrator (accessible from the Windows Control Panel).
-
Click the System DSN tab.
-
Click the Add button. The Create New Data Source dialog box appears.
-
Click Microsoft Text Driver (*.txt; *.csv).
-
Click the Finish button. The ODBC Text Setup dialog box appears.
-
Enter Apprise-Pack in the Data Source Name field.
-
Clear the Use Current Directory check box.
-
Click the Select Directory button.
-
Navigate to and select the folder that contains pkgop.txt.
-
Click the Options button. The ODBC Text Setup dialog box expands to display additional options.
-
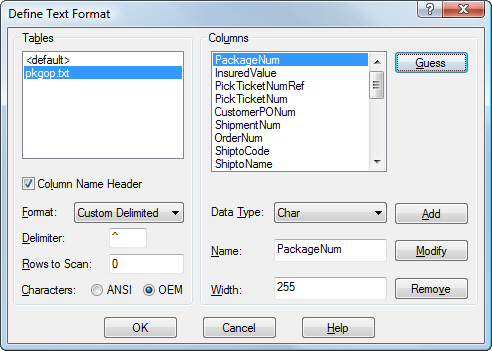
Click the Define Format button. The Define Text Format dialog box appears. Notice that the Tables field displays all the files in the folder you selected in substep i.
-
Select pkgop.txt.
-
Select the Column Name Header check box.
-
Click the Format drop-down arrow, and select Custom Delimited.
-
Enter ^ in the Delimiter field.
-
Click the Guess button. The system will scan the file and determine the data in the file, as follows:
-
Review each column displayed in the Columns field. Each column should be set up as the Char data type with a width of 255. If any columns need to be changed, make the changes, and click the Modify button.
-
Click the OK button. If a Failed to save table attributes error appears, you can ignore the error message, and click OK.
-
In the ODBC Text Setup dialog box, click OK to save the text driver.
Importing Package Data Into UPS WorldShip
Apprise integrates best with UPS WorldShip via the keyed import method. The key is the truncated pick demand number (NJ.123). This number can quickly and easily be keyed into the import window, which will then inform UPS to grab the appropriate package records from the package text file.
Note For details of using WorldShip, refer to the WorldShip documentation. The following steps may vary depending on the version of WorldShip you are using.
To import package data into UPS WorldShip:
-
In UPS WorldShip, select UPS Online Connect menu > Create/Edit Map.
-
Select Import from ODBC database.
-
Select Shipment.
-
Enter Apprise-Pack in the Map Name field.
-
Click the Create button. A list of datasources appears.
-
Select the Apprise-Pack datasource.
-
Click the OK button. The Edit "Apprise-Pack" import map window appears.
Note You do not need to enter an ID or password.
-
Click the ODBC Tables drop-down arrow, and select pkgop.txt. The window should now appear as follows:

-
Click the Primary Table button. A key icon will appear to the left of the pkgop.txt file name.
-
Select column 4 (PickTicketNum), and then click the Define Key button. A key icon appears to the left of column 4.
-
Link the ODBC columns with the proper WorldShip fields. Note that there is only one ODBC table (pkgop), but there are multiple WorldShip tables. Select each ODBC column and WorldShip field, and then click the Connect button. As each column and field is linked, they display in the What You Have Mapped So Far field. Each column and field should only be linked once. If a mistake is made select the incorrectly mapped column/field in the What You Have Mapped So Far field, and click the Disconnect button. The following is a list of the correct mappings.
|
Column Name |
Description |
Group |
Field |
|
PackageNum |
Apprise pick pack package number |
Package |
Reference 3 |
|
Insured Value |
oe-trailer.extended-unit-price times the quantity in the package summed up for each item |
Package |
Insured Value Amount |
|
PickTicketNumRef |
Untruncated pick demand number |
Package |
Reference 5 |
|
PickTicketNum |
Truncated pick demand number |
|
|
|
CustomerPONum |
Customer purchase order number |
Package |
Reference 1 |
|
ShipmentNum |
Truncated shipment/invoice number |
Package |
Reference 2 |
|
OrderNum |
Truncated customer order number |
Package |
Reference 4 |
|
ShiptoCode |
Customer code |
Ship To |
Customer ID |
|
ShiptoName |
Order ship-to name |
Ship To |
Company or Name |
|
ShiptoAddress1 |
Ship-to address line 1 |
Ship To |
Address 1 |
|
ShiptoAddress2 |
Ship-to address line 2 |
Ship To |
Address 2 |
|
ShiptoAddress3 |
Ship-to address line 3 |
Ship To |
Address 3 |
|
ShiptoCity |
Ship-to address city |
Ship To |
City or Town |
|
ShiptoState |
Ship-to address state |
Ship To |
State/Province/County |
|
ShiptoZip |
Ship-to address postal code |
Ship To |
Postal Code |
|
ShiptoCountry |
Ship-to address country |
Ship To |
Country/Territory |
|
ShiptoPhone |
Ship-to address phone number |
Ship To |
Telephone |
|
ShiptoContact |
Ship-to address contact |
Ship To |
Attention |
|
InsuranceOption |
Insurance option (YES, to indicate UPS should insure the package) |
Package |
Insured Value Option |
|
TotalPackages |
Total number of package records |
|
|
|
ShipVia |
Ship via on the package record |
|
|
|
SCAC |
Standard Carrier Alpha Code (SCAC) for the shipper |
|
|
|
OtherID |
shipper.other-id field |
Shipment Information |
Service Type |
|
ShipperCode |
Special shipper code |
Ship From |
UPS Account Number |
|
UCC128 |
UCC128 number |
|
|
|
PkgWeight |
Package weight |
Package |
Weight |
|
CartonUMCode |
Package unit of measure |
|
|
|
CartonLength |
Package length |
Package |
Length |
|
CartonWidth |
Package width |
Package |
Width |
|
CartonHeight |
Package height |
Package |
Height |
|
ShippingAccountID |
Order shipping account ID |
Ship To |
Receiver UPS Account Number |
|
Residential |
Y if the shipper is a residential shipper |
Ship To |
Residential Indicator |
|
BillTransportationTo |
Freight collection terms (TP for third-party, REC for Collect, or SHP for prepaid) |
Shipment Information |
Bill Transportation To |
|
TPBillToName |
For third-party freight collection terms, the third-party bill-to name |
Third Party |
Company or Name |
|
TPBillToAttention |
For third-party freight collection terms, the main contact for the third-party |
Third Party |
Attention |
|
TPBillToAddress1 |
For third-party freight collection terms, the first line of the third-party bill-to address |
Third Party |
Address 1 |
|
TPBillToAddress2 |
For third-party freight collection terms, the second line of the third-party bill-to address |
Third Party |
Address 2 |
|
TPBillToAddress3 |
For third-party freight collection terms, the third line of the third-party bill-to address |
Third Party |
Address 3 |
|
TPBillToCity |
For third-party freight collection terms, the city of the third-party bill-to address |
Third Party |
City or Town |
|
TPBillToState |
For third-party freight collection terms, the state of the third-party bill-to address |
Third Party |
State/Province/County |
|
TPBillToZip |
For third-party freight collection terms, the postal code of the third-party bill-to address |
Third Party |
Postal Code |
|
TPBillToUPSAccountNumber |
For third-party freight collection terms, the UPS account number of the third-party |
Third Party |
UPS Account Number |
|
SignatureRequired |
Y if a signature is required for delivered packages |
|
|
-
Click the OK button when you are finished mapping.
-
To start using the keyed import, go to the main UPS WorldShip window, and select UPS Online Connect menu > Keyed Import.
-
Click the More button. A list of defined maps appears.
-
Select the Apprise-Pack map and click the Import button. A small input field appears. This is the keyed import field.
-
Type or scan the truncated pick demand number, and UPS will import data for all packages for that pick demand. Note that the pick demand number is case sensitive.
-
Weigh each package. After all the weights are entered, the shipment can be processed.
Importing Tracking Numbers Into Apprise
To import tracking numbers back into Apprise, data must be exported from UPS and manually imported. The export out of UPS can be set up to occur after processing each shipment or during the end of the day process. After the package information has been exported, the export file can be imported into Apprise.
Note Apprise and UPS do not clear the contents of the file. The import file should be cleared out approximately once a week, depending on how large the export files become. There is no danger in importing the tracking number information multiple times.
Similar to the UPS import, the UPS export is defined using an ODBC datasource. To define the datasource, you must already have an export file.
To import tracking numbers back into Apprise:
-
Copy the following text into an empty text file in Notepad:
00000001^NJ000000123^1Z12345678901234^
-
Save the text file in the same location as the UPS import file.
-
Set up a Microsoft ODBC text driver to read in external data on every UPS system. To set this up, perform the following substeps:
-
Open the Windows ODBC Data Source Administrator (accessible from the Windows Control Panel).
-
Click the System DSN tab.
-
Click the Add button. The Create New Data Source dialog box appears.
-
Click Microsoft Text Driver (*.txt; *.csv).
-
Click the Finish button. The ODBC Text Setup dialog box appears.
-
Enter UPS-Pack in the Data Source Name field.
-
Clear the Use Current Directory check box.
-
Click the Select Directory button.
-
Navigate to and select the folder that contains pkgop.txt.
-
Click the Options button. The ODBC Text Setup dialog box expands to display additional options.
-
Click the Define Format button. The Define Text Format dialog box appears. Notice that the Tables field displays all the files in the folder you selected in substep i.
-
Select the text file you created in step 2.
-
Select the Column Name Header check box.
-
Click the Format drop-down arrow, and select Custom Delimited.
-
Enter ^ in the Delimiter field.
-
Click the Guess button. The system will scan the file and determine the data in the file.
-
Review each column displayed in the Columns field. Each column should be set up as the Char data type with a width of 255. If any columns need to be changed, make the changes, and click the Modify button.
-
Click the OK button. If a Failed to save table attributes error appears, you can ignore the error message, and click OK.
-
In the ODBC Text Setup dialog box, click OK to save the text driver.
-
Create a new map in UPS WorldShip. To do this, perform the following substeps:
-
Select the Export data from WorldShip check box.
-
Select Shipment from the selection box.
-
Enter a descriptive name for the export.
-
Map the fields using the following table (Note that the UPS tables are on the left side of the screen and the export file columns are on the right side of the screen).
|
Column Heading |
Description |
Group |
Field |
|
PackageNum |
Links back to a package record in Apprise |
Package |
Reference 1 |
|
PickTicketNumRef |
This is how you know the pick demand to which to link |
Package |
Reference 2 |
|
Tracking Number |
The UPS generated 1Z tracking number |
Package |
TrackingNumber |
|
Weight |
The weight of the package.weight, which is more accurate than the weight calculated in Apprise (it includes the weight of the box and other packaging materials). |
Package |
Weight
|
|
Freight Charge |
The base standard UPS charge for the package without any discounts |
Package |
Package Charge |
-
Click the UPS Online Connect drop-down arrow on the main UPS shipping window, and select whether to export the data during the end of day process or at the end of each shipment.
-
After the data is exported from UPS, use the Package Import to import the tracking numbers.