Wireless Warehouse - Receipt Count
Wireless Warehouse receipt count tasks are performed with a handheld device. When you perform a receipt count task, the handheld appears, as follows:
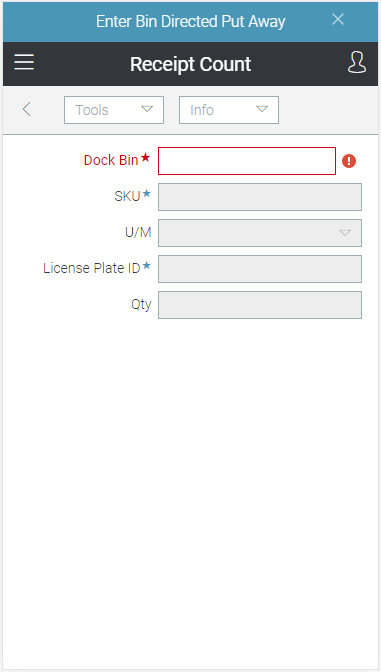
Purpose
Count received products.
Overview
Use the receipt count task to count received products for a receipt count demand, which was previously created in Receiving Count Create. You can enter the count by scanning, or by manually typing it. For more information, see Wireless Warehouse Receiving Process Flow.
Note This task is equivalent to using Receiving Count Entry to enter a receipt count.
Performing the Task
To perform a receipt count task:
-
At the Wireless Warehouse Handheld Menu, enter Get Next Task. The receipt count task screen appears, as shown above.
-
If the bin into which you are receiving is not automatically entered in the Dock Bin field, scan the bin, or enter it in the field.
-
Scan the product, or enter the product code, UPC, or GTIN in the SKU field. If you scan or enter a UPC that is associated with multiple product codes, a new handheld screen appears, which allows you to select the appropriate product code. If this screen appears, click a row in the grid to select a product. If the product, UPC, or GTIN has an associated unit of measure, the unit of measure is automatically entered in the U/M field.
-
If the unit of measure is not automatically entered, enter the unit of measure for the product in the U/M field.
-
If the product you scanned or entered in step 3 is tracked by lot or serial number, scan the lot or serial number, or enter it in the Lot/Ser field.
-
If the license plate is not automatically entered in the License Plate field, scan the license plate or enter it in the field. If the field is disabled and you want to use a new license plate, select Tools
 Next License Plate.
 -
If you are not required to scan each unit of the product, enter the quantity received in the Qty field. Put the product on a pallet (license plate) as you count it.
-
Repeat steps 2 to 7 for all received products.
-
When you are finished receiving all products for the receipt count demand, select Tools
Done. You have completed the task and the main menu appears.
Fields
|
Field |
Description |
|
Dock Bin |
Scan or enter the bin name. This field is only enabled if the Bin check box is selected for the receipt count task and zone in Zone Task Options. |
|
SKU |
|
|
U/M |
Enter the unit of measure for the product. The unit of measure is automatically entered if you scan the product, or enter a product's UPC or GTIN that is associated with a unit of measure. |
|
Lot/Ser |
Scan or enter the lot or serial number of a lot- or serial-tracked product. This field is not used for products that are not tracked by lot or serial number. |
|
License Plate |
Scan or enter the license plate number. Each license plate number is used for a separate receipt count putaway task. If this field is disabled, and you want to use a new license plate, select Tools Note You cannot enter two different products using the same license plate if the No Mixed Pallets check box is selected for the receipt count task and zone in Zone Task Options. |
|
Qty |
Enter the quantity received. This field is only enabled if the Enter Quantity radio button is selected for the receipt count task and zone in Zone Task Options. |
Tools Menu
|
Menu Command |
Description |
|
Done |
Select this option when you have completed the receipt count task. Selecting this option marks the receipt count task as complete. If your user ID has permission to mark a receipt count demand as complete, this also marks the demand as complete. If you do not have permission, the receipt count demand must be marked as complete in Receiving Count Complete. You can mark a receipt count demand as complete if the Can Complete Receipt Count check box is selected for your user ID in User Extended Options. |
|
Next License Plate |
Select this option to generate or enter the next license plate number. If Auto Generate License Plate is selected in the License Plate Option field in Zone Task Options for the receipt count task, selecting this option generates a new license plate number. If the license plate number is not automatically generated, you can scan or enter a license plate number. |
|
Menu |
Select this option to return to the main menu. For more information on the menu, see Wireless Warehouse Handheld Menu. |
Info Menu
|
Menu Command |
Description |
|
Ref # |
Select this option to display the receipt count demand number. |
|
Next Step |
Select this option to continue to the next step. |
|
Task # |
Select this option to display the Wireless Warehouse task number you are performing. |
|
User ID |
Select this option to display your user ID. |