Wireless Warehouse - Picking
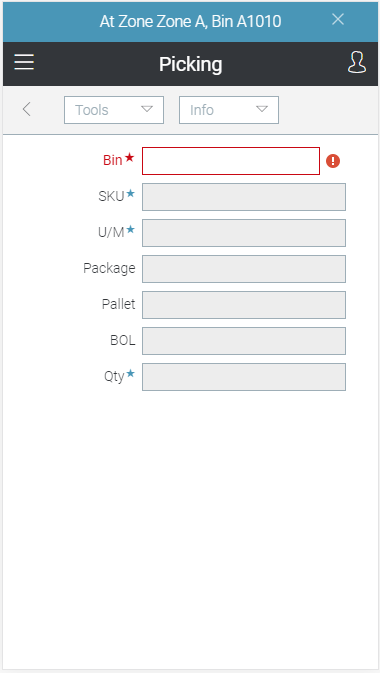
Wireless Warehouse picking tasks are performed with a handheld device. When you perform a picking task, the handheld appears, as follows:
Purpose
Pick products for a sales order.
Overview
Use the picking task to pick ordered products for a pick demand, which was previously created in Pick Demand Create and Print. You can enter the picking information by scanning, or by manually typing it.
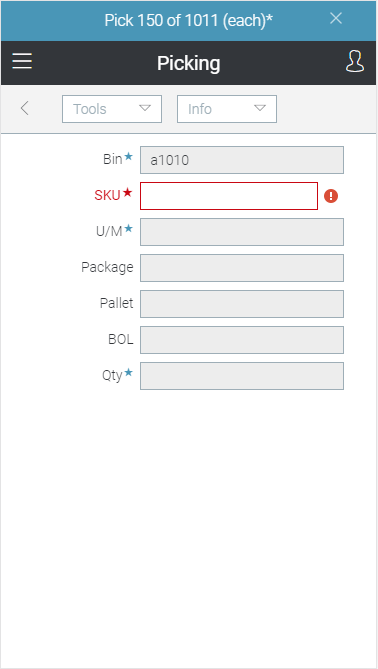
NOTE If products are over allocated for a picking task, an asterisk (*) appears to the right of the unit of measure at the top of the screen. This indicates that the associated bin replenishment task has not been completed.
For more information, see Wireless Warehouse Picking Process Flow.
Note This task is equivalent to using Pick Demand Confirm to confirm a pick demand.
Performing the Task
To perform a picking task:
-
At the Wireless Warehouse Handheld Menu, enter Get Next Task. The picking task screen appears.
-
If a remark appears on the handheld screen, read the remark, and then click Close Remark to proceed. Remarks appear on the handheld if remarks were added to pick demands for the order, order line, customer, and/or product. Remarks only display once per order per task. The bin displays at the top of the handheld screen to direct you to go to a specific bin.
-
If the bin from which you are picking is not automatically entered in the Bin field, scan the bin, or enter it in the field. The product code, quantity to pick, and unit of measure display at the top of the handheld screen.
-
Scan the picked product, or enter the product code, UPC, or GTIN in the SKU field.
-
If the unit of measure is not automatically entered, enter the unit of measure displayed for the product you are picking in the U/M field. You cannot change the unit of measure because you must pick in the correct unit of measure. If you are using the Cartonization feature, the carton code and package number display at the handheld screen.
-
If the product is tracked by lot or serial number, scan the lot or serial number, or enter it in the Lot or Serial field.
-
If your company uses the Advanced Packaging or Cartonization feature, and the package number is not automatically entered in the Package field, scan the package or enter the package number in the field. If the field is disabled, and you want to use a new package number, select Tools
 Package. If your company does not use the Advanced Packaging or Cartonization feature, you can skip this step.
If your company requires you to scan a UCC128 label for every package, apply and scan the UCC128 label. If your company allows you to scan a range of packages, apply labels for the range, and scan the first and last package in the range.
If your company allows multi-order picking and if you are picking products into totes, then scan the barcode on the tote or enter the ID of the tote in the Tote ID field for the first time that you pick the products for an order. The system links the tote to that order. The next time you pick the products for that order, the system directs you to the linked tote.
Note Products from the same order must be picked into the same tote. For more information, see Example - Basic Rule for Picking into Totes.
-
If the pallet number is not automatically entered in the Pallet field and pallet labels are used for the zone and customer, scan the pallet or enter the pallet number in the field. If the field is disabled, and you want to use a new pallet number, select Tools
Pallet. -
If you are not required to scan each unit of the product, enter the quantity picked in the Qty field. When you enter the quantity, the product is moved in the system to your user bin. If you are required to scan each unit of the product, repeat steps 3 to 8.
-
Repeat steps 2 to 9 for all products you are picking.
If you need to stop picking to put products into the laydown bin, select Tools ![]() Putdown, then scan the laydown bin, or enter the bin name in the Bin field. You can then resume picking, but you must use the same laydown bin for the pick demand.
Putdown, then scan the laydown bin, or enter the bin name in the Bin field. You can then resume picking, but you must use the same laydown bin for the pick demand.
Note For multi-order picking, if you are picking into totes, then you can put down a tote only if you have picked all the products related to that order in the tote. If not, you cannot put down the tote.
If the bin from which you are picking does not contain the expected quantity of the product (i.e, there is no more product on the shelf), select Tools ![]() Short, confirm that you want to mark the pick quantity as being short of the expected quantity, and then continue picking any other products for the pick demand.
Short, confirm that you want to mark the pick quantity as being short of the expected quantity, and then continue picking any other products for the pick demand.
If your company uses the Cartonization feature and products do not fit in a carton, select Tools ![]() Repackage. You will need to reprint all labels for the package you are packing and all unpacked packages.
Repackage. You will need to reprint all labels for the package you are packing and all unpacked packages.
If all products for the task are picked, all fields except the Bin field are hidden, and you can continue to the next step.
If you are picking single-single line orders which must be picked into packages with preset dimensions, then the Single-single picking screen opens. Enter the predefined carton code in the Carton Code field.
-
Scan the laydown bin, or enter the bin name in the Bin field, as you put the product down on the loading dock.
Note You can only put products for a picking task in a single laydown bin. If you previously put products into a laydown bin for the task, you must use that bin.
Note If you have picked into packages, then you have completed the task and the main menu appears. In other words, both picking and packaging processes are completed. If you have picked into totes, the picking process is completed, but not the packaging. The system stops the pick demands from being inventory adjust until the products are packaged. For more information about packaging, see Pick Demand Confirm.
Fields
|
Field |
Description |
|
Bin |
Scan or enter the bin name. This field is only enabled if the Bin check box is selected for the picking task and zone in Zone Task Options. This field is also used to enter a laydown bin, when putting down product during or at the end of picking. |
|
SKU |
|
|
U/M |
This field displays the unit of measure for the product. Note You must pick in this unit of measure; it cannot be changed during picking. |
|
Lot |
Scan or enter the lot for lot-tracked products. This field is only available for lot-tracked products. |
|
Serial |
Scan or enter the serial number for serial-tracked products. This field is only available for serial-tracked products. |
|
Package |
Scan or enter the package number if your company is using the Advanced Packaging or Cartonization feature. If this field is disabled, and you want to use a new package number, select Tools |
|
Tote ID |
Scan or enter the tote ID. This field is only available when picking into totes is enabled for multi-order picking. Pick items from the same order into the same tote. Ensure that you assign one tote for each order in your picking task. |
|
Pkg From |
Scan or enter the first UCC128 label number in a range of UCC128 numbers. This field is only available if the Use Wireless Package Range Quantity Scan check box is selected for the zone in Zone Maintenance, and your company is using UCC128 labels. |
|
Pkg To |
Scan or enter the last UCC128 label number in a range of UCC128 numbers. This field is only available if the Use Wireless Package Range Quantity Scan check box is selected for the zone in Zone Maintenance, and your company is using UCC128 labels. |
|
Pallet |
Scan or enter the pallet number. If this field is disabled, and you want to use a new pallet number, select Tools |
|
BOL |
This field displays the bill of lading number associated with the pick demand (if one is associated with the pick demand). This field is disabled, and cannot be changed. |
|
Qty |
Enter the quantity picked. This field is only enabled if the Enter Quantity radio button is selected for the picking task and zone in Zone Task Options. |
Tools Menu
|
Menu Command |
Description |
|
Putdown |
Select this option to put down picked products in a laydown bin. After you select this option, you must scan the bin or enter the laydown bin name. |
|
Short |
Select this option to indicate that there is not enough product to pick from the bin. If you select this option, the handheld displays the following message: Are you sure you want to confirm this task short (Y/N)? If you confirm it, a Wireless Warehouse manager alert is created, and you can continue picking other products (or enter a laydown bin if you were picking the last product for the task). |
|
Skip |
Select this option to skip picking for a product if it was over allocated, and the bin replenishment task has not yet been performed. This allows you to continue other products. The pick demand is not fully confirmed until the skipped product is picked. |
|
Package |
Select this option to generate or enter a new package number. If Auto Generate Package ID is selected in the Package Option field in Zone Task Options, selecting this option generates a new package number. If the package number is not automatically generated, you can enter a package number. This option is disabled if you are using UCC128 labels. |
|
Repackage |
Select this option if products do not fit in a package, and you need to recalculate packages. If you select this option, you must reprint all labels for the current package and all packages you have not yet packed. This option is only available if you are using cartonization. For more information on cartonization, see Cartonization FAQ. |
|
Pallet |
Select this option to generate or enter a new pallet number. If Auto Generate Pallet Tag is selected in the Pallet Option field in Zone Task Options, selecting this option generates a new pallet number. If the pallet number is not automatically generated, you can enter a pallet number. |
|
Details |
Select this option to display Wireless Warehouse - Details, which allows you to view information for an over allocated product. |
|
Menu |
Select this option to return to the main menu. For more information on the menu, see Wireless Warehouse Handheld Menu. |
Info Menu
|
Menu Command |
Description |
|
Task # |
Select this option to display the Wireless Warehouse task number you are performing. |
|
Ref # |
Select this option to display the pick demand number. |
|
Next Step |
Select this option to continue to the next step. |
|
User ID |
Select this option to display your user ID. |
|
Product Detail |
Select this option to display information about the products you are picking, including the product code, product name, unit of measure, and picked/required quantities. |
|
Product Inquiry |
Select this option to display Wireless Warehouse - Product Inquiry, which allows you to view inventory for a specific product. |
|
Bin Inquiry |
Select this option to display Wireless Warehouse - Bin Inquiry, which allows you to view products in a specific bin. |
|
Task Info |
Select this option to display the following task information:
|