Using Product Lifecycle Management
Before you can use the Product Lifecycle Management module, you must set up product lifecycle management, teams, tasks, workflow definitions, and rules. You may also want to set up product projects to track new development for which database records do not yet exist. For example, if you want to track development of a new product that has not been assigned a product code, you could create a product project for the product.
NOTE If you have a supplier portal site, Product Lifecycle Management functionality can be accessed via the site. You can set up supplier portal roles and users to access the site.
To set up the Product Lifecycle Management module:
-
In Lifecycle Control Maintenance, set up options for assigning product project codes.
-
In Lifecycle Team Maintenance, set up product lifecycle management teams for groups of users that will perform specific product lifecycle management processes. Assign users and locations to the teams.
-
In Lifecycle Task Maintenance, set up product lifecycle management tasks for each step of product lifecycle management processes. You can also import tasks in Lifecycle Task Import. For more information on setting up tasks, see Creating Product Lifecycle Management Tasks.
-
In Lifecycle Master Table Maintenance, set up master tables (tables of default data) for grid tasks for which you want values to automatically be entered.
-
In Lifecycle Definition Group Maintenance, set up workflow definition groups, which are groups of related processes.
-
In Lifecycle Definition Maintenance, set up a workflow definition for each product lifecycle management process. For more information on setting up workflow definitions, see Creating Product Lifecycle Management Workflow Definitions.
-
If you are tracking development for new products, product lines, styles, product categories, or product subcategories, create product projects for the new development in Product Project Maintenance.
-
In Lifecycle Rule Maintenance, set up workflow, team, and alert rules to control which workflow definitions are assigned, which product lifecycle management teams are assigned workflows, and which events trigger alerts. You can then arrange the rules hierarchy to define the rules that take precedence over other rules. For more information on setting up rules, see Creating Product Lifecycle Management Rules.
To use the Product Lifecycle Management module to complete workflows:
-
In Lifecycle Workflow Assignment, assign workflow definitions to workflows. You can also assign a workflow definition to a single workflow at a time in Lifecycle Workflow Launch.
-
In Lifecycle Team Assignment, assign product lifecycle management teams to workflows.
-
Run Lifecycle Task Status Update each night to change the status of Open status tasks to a status of Assigned if a number of days has passed since all prerequisite tasks were completed.
-
Run Lifecycle Alert Create each night to create alerts based on alert rules for product lifecycle management teams for days reminder, days past due, and linked task alert rules.
-
In Lifecycle Data Entry Management, select workflows for which to enter workflow definition data, and enter the data in Lifecycle Data Entry. You can also perform data entry for multiple workflows or tasks using Lifecycle Workflow Management or Lifecycle Task Management. You can export an Excel spreadsheet of tasks in Lifecycle Data Export, enter the data directly in the spreadsheet, and then import the data for the tasks in Lifecycle Entry Import.
For a visual representation of the Product Lifecycle Management workflows, see Product Lifecycle Management Process Flow Diagrams.
Example of a Product Lifecycle Management Workflow
The following diagram illustrates data that a company may track for a product lifecycle management workflow, including the specific tasks for the first stage.
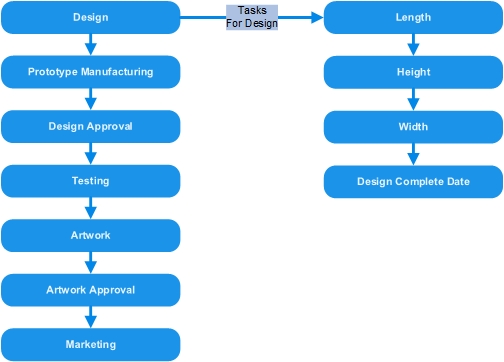
To track this data, you can set up a workflow definition to create the following data entry window:
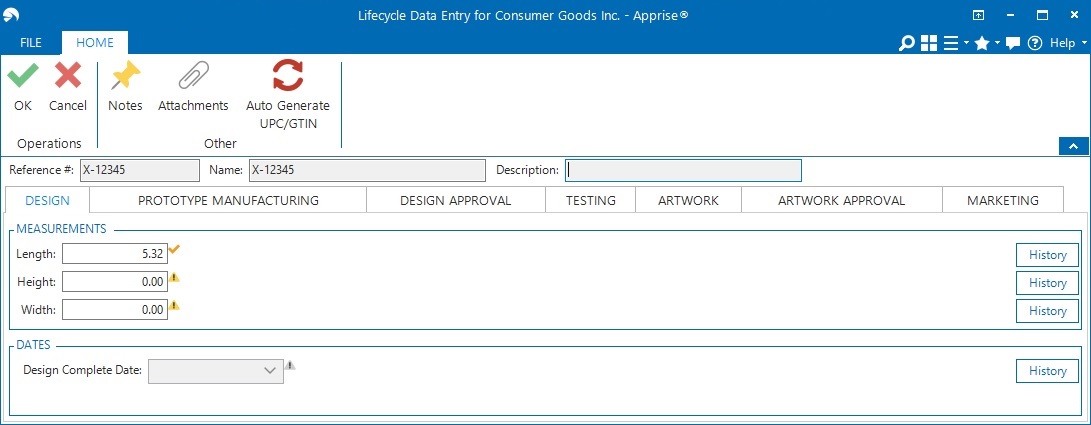
Notice that each stage in the workflow is represented by a separate tab in the data entry window. Data for each task is stored in a field in the tab.
Setting Up Task Security
You can assign security levels to tasks to ensure that only the appropriate product lifecycle management teams can perform and/or view the tasks. You can select one of the following security levels for tasks:
-
Default - Inherit the default security level for the tab or section in which the task is included. This option is selected by default. If this option is selected for a tab and a task on the tab (or a task on a section on the tab), all users can view the task, but only users from an assigned team can update the task.
-
Hide - Hide the task from all users except for users from an assigned team.
-
Update - Allow all users to view and update the task.
-
View - Allow all users to view the task, but only allow users from an assigned team to update the task.
Additionally, you can set up team-specific security for tasks, sections, and tabs. Team-specific security for tasks overrides any inherited security. As a result, if you select Default for a task, the security follows the following hierarchy:
-
Team-specific security for the task
-
Team-specific security for the section/tab in which the task is included
-
Security for the section/tab in which the task is included
The following diagram illustrates a security setting hierarchy that you could set up for a tab that contains two sections and five tasks.

Team A can view and update all tasks because the task security is inherited from the tab and there is not team-specific security set up for Team A.
Team B can view/update tasks, as follows:
-
Task 1: Can view and update (security inherited from tab)
-
Task 2: Can view and update (security inherited from tab)
-
Task 3: Cannot view or update (security inherited from section)
-
Task 4: Cannot view or update (security inherited from section)
-
Task 5: Can view only (team-specific security for task)
Assigning Tasks to Teams
You can assign tasks to product lifecycle management teams using workflow rules, or by setting up team assignment in the workflow definition. Team assignment follows the following hierarchy:
-
Team assigned to a specific task
-
Team assigned to a specific section in which a task resides
-
Team assigned to a specific tab in which a task resides
-
Team assigned by a workflow rule set up for a specific task
-
Team assigned by a workflow rule set up for a specific section
-
Team assigned by a workflow rule set up for a specific tab